Difference between revisions of "Data Jobs (DP)"
Jump to navigation
Jump to search
(Created page with "Category:Data Portal Functions == Overview == Having set up your connections you can now create and run data jobs to pull the information into your Registry. File:Data...") |
|||
| Line 5: | Line 5: | ||
[[File:Data Jobs.png|800px]]<br> | [[File:Data Jobs.png|800px]]<br> | ||
| − | == Data | + | == Create Data Job == |
{| class="wikitable" | {| class="wikitable" | ||
| Line 15: | Line 15: | ||
|- | |- | ||
| Connection || Select which connection you want to use for the Job. | | Connection || Select which connection you want to use for the Job. | ||
| + | |- | ||
| + | | Sync Dataflows || You can select All Dataflows found or, if you chose Specific Dataflows Fusion Portal will display a list of Dataflows from which you can select an individual Dataflow. | ||
|- | |- | ||
| Data Store || The default is the "in memory" Fusion Data Store. If you have set up any additional Data Sources, they will appear on the list. | | Data Store || The default is the "in memory" Fusion Data Store. If you have set up any additional Data Sources, they will appear on the list. | ||
| Line 22: | Line 24: | ||
[[File:Create-Data-Job.png|500px]] | [[File:Create-Data-Job.png|500px]] | ||
| + | |||
| + | Click Apply. | ||
| + | |||
| + | == Run Data Job == | ||
| + | Select the data job and click the Run Job button. | ||
| + | |||
| + | [[File:Data Job Run.png|500px]] | ||
| + | |||
| + | You will be prompted to confirm and then be advised that a sync has been requested. Fusion Portal will now obtain all the relevant structures and data for your Dataflow(s). | ||
| + | |||
| + | == Data Transaction History == | ||
| + | This option will show details relating to all Data Jobs. | ||
| + | |||
| + | [[File:Data Transactio History.png|600px]] | ||
| + | |||
| + | This shows the detailed results of the Job. | ||
| + | |||
| + | You can see further details by using the View Audit button which allows you to View the Raw Logs and View the Raw Audit. | ||
Revision as of 05:32, 17 August 2023
Overview
Having set up your connections you can now create and run data jobs to pull the information into your Registry.
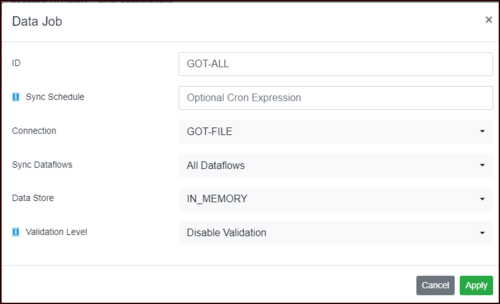
Create Data Job
| ID | Each Job must have an unique ID, a maximum of 20 Characters are allowed. |
| Sync Schedule | Optional Cron expression to automate the execution of this job against a schedule.
Click Here for help building an expression. |
| Connection | Select which connection you want to use for the Job. |
| Sync Dataflows | You can select All Dataflows found or, if you chose Specific Dataflows Fusion Portal will display a list of Dataflows from which you can select an individual Dataflow. |
| Data Store | The default is the "in memory" Fusion Data Store. If you have set up any additional Data Sources, they will appear on the list. |
| Validation Level | Some datasets may fail validation due to inconsistencies between the metadata and the data (for example reported code Ids which are not in the supporting codelist). Disable validation to ensure datasets are imported even if they are not technically valid against the SDMX metadata |
Click Apply.
Run Data Job
Select the data job and click the Run Job button.
You will be prompted to confirm and then be advised that a sync has been requested. Fusion Portal will now obtain all the relevant structures and data for your Dataflow(s).
Data Transaction History
This option will show details relating to all Data Jobs.
This shows the detailed results of the Job.
You can see further details by using the View Audit button which allows you to View the Raw Logs and View the Raw Audit.


