Difference between revisions of "Fusion Fame Mapper"
(→Create and maintain the series mapping rules for a mapped dataflow) |
(→Operating procedures in Regnology Release R1.1.0.00 July 2024 (Draft)) |
||
| (58 intermediate revisions by 3 users not shown) | |||
| Line 1: | Line 1: | ||
=Overview= | =Overview= | ||
| − | Fusion Fame Mapper is a decoupled Fusion Registry user interface for maintaining rules mapping FAME-style datasets characterised by a single dimension to multi-dimensional | + | Fusion Fame Mapper is a decoupled Fusion Registry user interface for maintaining rules mapping FAME-style datasets to multi-dimensional dataflows. FAME-style datasets are characterised by having a single dimension usually called SERIES_CODE or equivalent. |
| + | |||
| + | it is a web tool for Fusion Registry Core for mapping series with a single dimension to richer multi-dimensional structures using SDMX structure mapping rules. | ||
| + | |||
| + | The main use case is mapping FAME series which typically have a single 'series code' dimension to SDMX multi-dimensional structures including dimensions and attributes like: FREQ, INDICATOR, REF_AREA and UNIT_MULT. However, it will work with source data with a single dimension like 'Indicator'. | ||
| + | |||
| + | These ''mapped dataflows'' are similar in some respects to SQL views, however, rules must be defined setting the dimension and attribute values for each individual series. | ||
Compatibility: Fusion Registry 11.0 and later. | Compatibility: Fusion Registry 11.0 and later. | ||
| − | [[File:FusionFameMapper 1.png| | + | [[File:FusionFameMapper 1.png|800px]] |
| + | |||
| + | '''New in Regnology Release R1.1.0.00 July 2024''' | ||
| + | |||
| + | The Overview Page has been re-designed and additional functionality has been introduced to facilitate editing an existing mapping. | ||
| + | |||
| + | [[File:Overview page.png|800px]] | ||
| + | |||
| + | = Operating procedures in Regnology Release R1.1.0.00 July 2024 = | ||
| + | |||
| + | Fusion Fame Mapper has functions for adding and removing mapped dataflows, maintaining the mapping rules for each mapped dataflow, viewing and editing the rules including a validation report. | ||
| + | |||
| + | ==Add a new mapped dataflow== | ||
| + | Use this procedure to create a new, empty mapped dataflow. | ||
| + | |||
| + | '''Step 1 Source Dataflow''' | ||
| + | |||
| + | * Create a source Dataflow structure for the Fame-style dataflow. | ||
| + | * Create a Provision Agreement and if you want to use the Validation process, publish the data that you wish to create a mapping for. | ||
| + | |||
| + | '''Step 2 Target Dataflow''' | ||
| + | If it does not already exist, use Fusion Registry to create the output Dataflow with the required multi-dimensional structure. Again, if you want to use the Validate Map feature, please load and publish data. | ||
| + | |||
| + | '''Step 3 Add a new dataflow mapping'''<br> | ||
| + | Use the ''Add'' button to add a new dataflow mapping | ||
| + | |||
| + | The ''Mapped Source'' is an existing dataflow linked to data store which follows the Fame model of a single dimension called SERIES_CODE or similar. The list shows just dataflows in the Registry with a single dimension.<br> | ||
| + | The ''Mapped Target'' is the multi-dimensional dataflow. The list shows just dataflows in the Registry with multiple dimensions. | ||
| + | |||
| + | [[File:Add Mapping.png|500px]] | ||
| + | |||
| + | |||
| + | '''Step 4 View the Mapping''' | ||
| + | |||
| + | This option allows you to view an existing Mapping, edit an existing Mapping or create a new Mapping. | ||
| + | |||
| + | '''Export Mapping''' | ||
| + | This option is available from the overview page and at detail level. This can also be used to create and maintain the series mapping rules as detailed in [[Fusion_Fame_Mapper#Create_and_maintain_the_series_mapping_rules_for_a_mapped_dataflow | Version 1.0 Operating Procedures as detailed below.]] | ||
| + | |||
| + | == Creating and maintaining a map using the View/Edit button == | ||
| + | ===Overview=== | ||
| + | Select a Map and then click View. | ||
| + | |||
| + | An example map is shown below. | ||
| + | |||
| + | [[File:Detail - overview.png|1000px]] | ||
| + | |||
| + | |||
| + | === Editing the Source cells === | ||
| + | |||
| + | To add a new row simply edit the first row that has the colour white. | ||
| + | |||
| + | [[File:Adding row.png|800px]] | ||
| + | |||
| + | |||
| + | === Editing the Target cells === | ||
| + | |||
| + | * By clicking the cell, it becomes editable. | ||
| + | * To see the list of possible values (if the concept in the Target Data Structure is enumerated), start typing the value. | ||
| + | * If display a list of possible values, empty the cell content and then press the space bar. | ||
| + | * In case of an empty cell/missing value the cell will be coloured in red. | ||
| + | * If the cell value is changed or modified, the cell will be coloured in yellow. | ||
| + | |||
| + | After filling in all details click the ''''Add Row'''' button | ||
| + | |||
| + | Mapper will validate the entries and should it find an error, a message will appear by the options bar. | ||
| + | |||
| + | Once a row is successfully added, the colour of the row will remain white and the 'Has Data' column will have the value 'ADDED' | ||
| + | |||
| + | [[File:Sucessful Add.png|800px]] | ||
| + | |||
| + | |||
| + | '''Note''' at this stage the data has not been saved to the Registry. | ||
| + | |||
| + | === Deleting a row === | ||
| + | |||
| + | To delete a row, simply select it and click Delete. The row will change colour to grey and the Has Data column will show "DELETED". When the Map is saved deleted rows will be removed. | ||
| + | |||
| + | === Using the Filters === | ||
| + | |||
| + | The Columns allow you to filter the rows displayed. | ||
| + | |||
| + | [[File:Filters.png|800px]] | ||
| + | |||
| + | |||
| + | Clicking on the "hamburger" icon will display an option box to enable you to make your selection. | ||
| + | |||
| + | [[File:Filter options.png|200px]] | ||
| + | |||
| + | === Exporting the Map === | ||
| + | |||
| + | Mapper will create an Excel spreadsheet showing the filtered view of the map however if you have added and/or deleted rows, you must Save the map prior to using the Export facility. | ||
| + | |||
| + | === Validate Map === | ||
| + | Once you have completed your editing, it is wise to '''Validate''' the map but you must '''Save''' any changes first. In order to use the '''Validate''' option you need to have published data in both of the source and target dataflows. | ||
| + | |||
| + | Example Map prior to editing. | ||
| + | |||
| + | [[File:Map before vaidation.png|1000px]] | ||
| + | |||
| + | |||
| + | On clicking Validate, a validation report will appear as shown in the example below. | ||
| + | |||
| + | [[File:Validation report.png|1000px]] | ||
| + | |||
| + | When you close the report and return to the View page, rows with errors will be highlighted in red. The number of errors will also be displayed, click on the row to see more information at the foot of the page. | ||
| + | |||
| + | [[File:Map with validation errors.png|1000px]] | ||
| + | |||
| + | === Saving Changes === | ||
| + | * To preserve changes, click '''Save'''. After using '''Save''', the Structure and Representation Maps will be updated in Fusion Registry. | ||
| + | * Duplication check takes place at this stage. In case any duplication is found then a message listing all duplicated values will appear. | ||
| + | * If any errors are found, a notification will be displayed. | ||
| + | * If you select Export the contents of the Excel sheet will not reflect the ongoing changes unless they are saved. | ||
| + | |||
| + | =Operating procedures using Version 1.0 = | ||
| + | Fusion Fame Mapper has functions for adding and removing mapped dataflows, maintaining the mapping rules for each mapped dataflow, and viewing the rules. | ||
| + | |||
| + | Maintenance of mapping rules is performed by exporting the rules to Excel where they can be modified before reloading the workbook using Fusion Registry's normal structural metadata submission process. Users maintaining mapping rules must therefore have ''structure write'' permissions. | ||
| − | |||
==Add a new mapped dataflow== | ==Add a new mapped dataflow== | ||
| − | '''Step 1 | + | Use this procedure to create a new, empty mapped dataflow. |
| − | If it does not already exist, create the Dataflow | + | |
| + | '''Step 1 Create a Dataflow structure for the mapped dataflow'''<br> | ||
| + | If it does not already exist, use Fusion Registry to create the output Dataflow with the required multi-dimensional structure. | ||
| + | |||
| + | You should also add a Data Provider on Step 3 of the Dataflow Wizard | ||
| − | '''Step 2 | + | '''Step 2 Add a dataflow mapping'''<br> |
Use the ''Add'' button to add a new dataflow mapping | Use the ''Add'' button to add a new dataflow mapping | ||
| − | The ''Mapped Source'' is an existing dataflow linked to data store which follows the Fame model of a single dimension called SERIES_CODE or similar.<br> | + | The ''Mapped Source'' is an existing dataflow linked to data store which follows the Fame model of a single dimension called SERIES_CODE or similar. The list shows just dataflows in the Registry with a single dimension.<br> |
| − | The ''Mapped Target'' is the multi-dimensional dataflow. | + | The ''Mapped Target'' is the multi-dimensional dataflow. The list shows just dataflows in the Registry with multiple dimensions. |
| + | |||
| + | |||
| + | '''Step 3 Export the mapping'''<br> | ||
| + | Please refer to the following section which describes how to create your first mapping | ||
==Create and maintain the series mapping rules for a mapped dataflow== | ==Create and maintain the series mapping rules for a mapped dataflow== | ||
| − | A mapped dataflow consists of a list of rules describing the dimension and attributes values for its series. | + | A mapped dataflow consists of a list of rules describing the dimension and attributes values for its series which are maintained using Excel. |
| − | '''Step 1 | + | '''Step 1 Export the dataflow mapping to Excel'''<br> |
Select the dataflow mapping from the list and export the list of rules to an Excel workbook using the ''Export'' button. | Select the dataflow mapping from the list and export the list of rules to an Excel workbook using the ''Export'' button. | ||
Search the list of dataflows using the ''quick filter''. | Search the list of dataflows using the ''quick filter''. | ||
| − | '''Step 2 | + | '''Step 2 Add and modify series mapping rules in the Excel workbook'''<br> |
The Excel workbook has one row per series with the first column the SERIES_CODE or identifier of the Fame series to be mapped. The remaining columns are the dimensions and attributes for the series in the multi-dimensional mapped dataflow. | The Excel workbook has one row per series with the first column the SERIES_CODE or identifier of the Fame series to be mapped. The remaining columns are the dimensions and attributes for the series in the multi-dimensional mapped dataflow. | ||
| − | Do not modify rows 1 and 2 which contain information needed by Fusion Registry. | + | '''Do not modify rows 1 and 2''' which contain information needed by Fusion Registry. |
[[File:FusionFameMapper Excel.png|600px]] | [[File:FusionFameMapper Excel.png|600px]] | ||
| − | ''' | + | [[File:Sign.png|30px]] Implicity mapped dimensions and attributes do not appear in the Excel export |
| + | |||
| + | Dimensions and attributes that have the same ID in both the source and target dataflows are ''implicitly mapped'' and do not appear in the Excel export.The values for those dimensions and attributes are automatically copied from the source to the target. For instance, both dataflows may have a SERIES_CODE dimension and a SERIES_CONF attribute. Neither of those components will appear in the mapped values columns of the Excel workbook but each target series will have the SERIES_CODE and SERIES_CONF values from the source. | ||
| + | |||
| + | '''Step 3 Import the modified dataflow mapping Excel into Fusion Registry'''<br> | ||
Import the Excel workbook using the Fusion Registry [[File:LoadStructuers.JPG]] function. | Import the Excel workbook using the Fusion Registry [[File:LoadStructuers.JPG]] function. | ||
| + | |||
| + | ==View the series mapping rules for a mapped dataflow== | ||
| + | Use the ''View'' button to examine the series mapping rules for the select dataflow mapping. The ''Export'' button exports the mapping rules to Excel if modifications are needed. | ||
| + | |||
| + | Search for specific series using the filter. The example below filters for series where the SERIES_CODE contains '34'. | ||
| + | |||
| + | [[File:FusionFameMapper 2.png|600px]] | ||
Latest revision as of 03:36, 17 July 2024
Contents
Overview
Fusion Fame Mapper is a decoupled Fusion Registry user interface for maintaining rules mapping FAME-style datasets to multi-dimensional dataflows. FAME-style datasets are characterised by having a single dimension usually called SERIES_CODE or equivalent.
it is a web tool for Fusion Registry Core for mapping series with a single dimension to richer multi-dimensional structures using SDMX structure mapping rules.
The main use case is mapping FAME series which typically have a single 'series code' dimension to SDMX multi-dimensional structures including dimensions and attributes like: FREQ, INDICATOR, REF_AREA and UNIT_MULT. However, it will work with source data with a single dimension like 'Indicator'.
These mapped dataflows are similar in some respects to SQL views, however, rules must be defined setting the dimension and attribute values for each individual series.
Compatibility: Fusion Registry 11.0 and later.
New in Regnology Release R1.1.0.00 July 2024
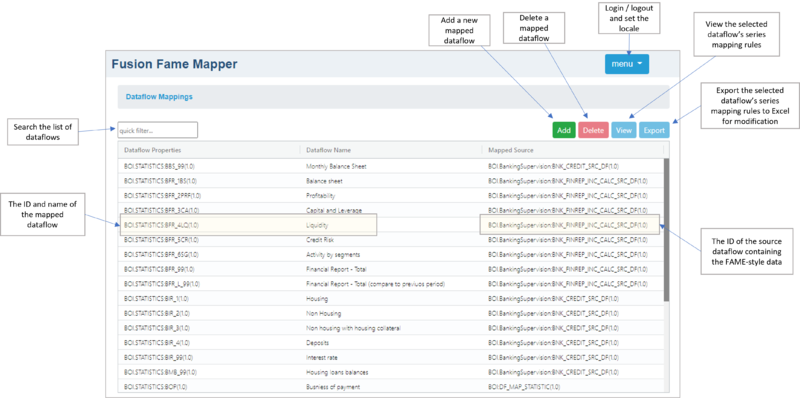
The Overview Page has been re-designed and additional functionality has been introduced to facilitate editing an existing mapping.
Operating procedures in Regnology Release R1.1.0.00 July 2024
Fusion Fame Mapper has functions for adding and removing mapped dataflows, maintaining the mapping rules for each mapped dataflow, viewing and editing the rules including a validation report.
Add a new mapped dataflow
Use this procedure to create a new, empty mapped dataflow.
Step 1 Source Dataflow
- Create a source Dataflow structure for the Fame-style dataflow.
- Create a Provision Agreement and if you want to use the Validation process, publish the data that you wish to create a mapping for.
Step 2 Target Dataflow If it does not already exist, use Fusion Registry to create the output Dataflow with the required multi-dimensional structure. Again, if you want to use the Validate Map feature, please load and publish data.
Step 3 Add a new dataflow mapping
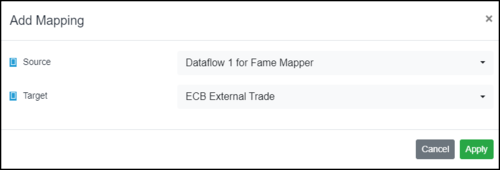
Use the Add button to add a new dataflow mapping
The Mapped Source is an existing dataflow linked to data store which follows the Fame model of a single dimension called SERIES_CODE or similar. The list shows just dataflows in the Registry with a single dimension.
The Mapped Target is the multi-dimensional dataflow. The list shows just dataflows in the Registry with multiple dimensions.
Step 4 View the Mapping
This option allows you to view an existing Mapping, edit an existing Mapping or create a new Mapping.
Export Mapping This option is available from the overview page and at detail level. This can also be used to create and maintain the series mapping rules as detailed in Version 1.0 Operating Procedures as detailed below.
Creating and maintaining a map using the View/Edit button
Overview
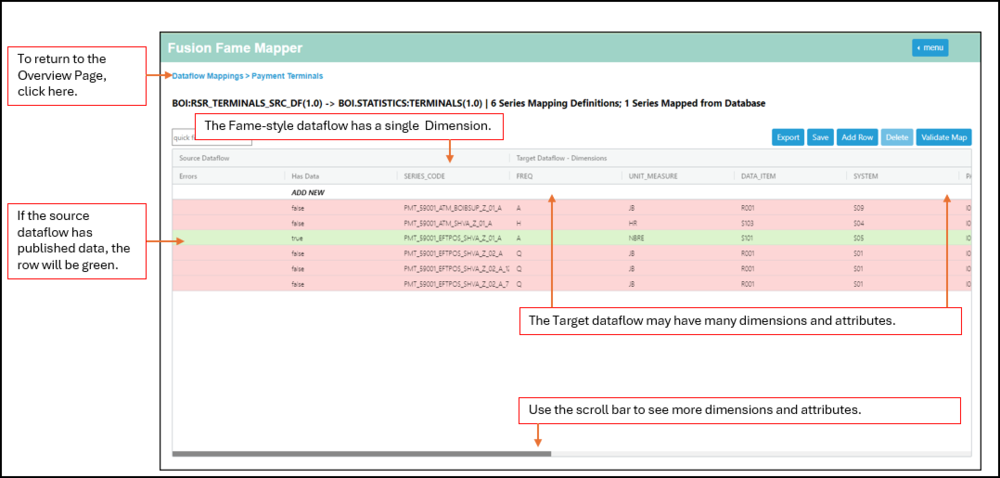
Select a Map and then click View.
An example map is shown below.
Editing the Source cells
To add a new row simply edit the first row that has the colour white.
Editing the Target cells
- By clicking the cell, it becomes editable.
- To see the list of possible values (if the concept in the Target Data Structure is enumerated), start typing the value.
- If display a list of possible values, empty the cell content and then press the space bar.
- In case of an empty cell/missing value the cell will be coloured in red.
- If the cell value is changed or modified, the cell will be coloured in yellow.
After filling in all details click the 'Add Row' button
Mapper will validate the entries and should it find an error, a message will appear by the options bar.
Once a row is successfully added, the colour of the row will remain white and the 'Has Data' column will have the value 'ADDED'
Note at this stage the data has not been saved to the Registry.
Deleting a row
To delete a row, simply select it and click Delete. The row will change colour to grey and the Has Data column will show "DELETED". When the Map is saved deleted rows will be removed.
Using the Filters
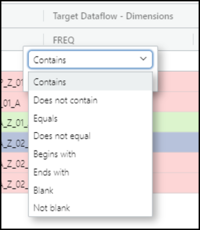
The Columns allow you to filter the rows displayed.
Clicking on the "hamburger" icon will display an option box to enable you to make your selection.
Exporting the Map
Mapper will create an Excel spreadsheet showing the filtered view of the map however if you have added and/or deleted rows, you must Save the map prior to using the Export facility.
Validate Map
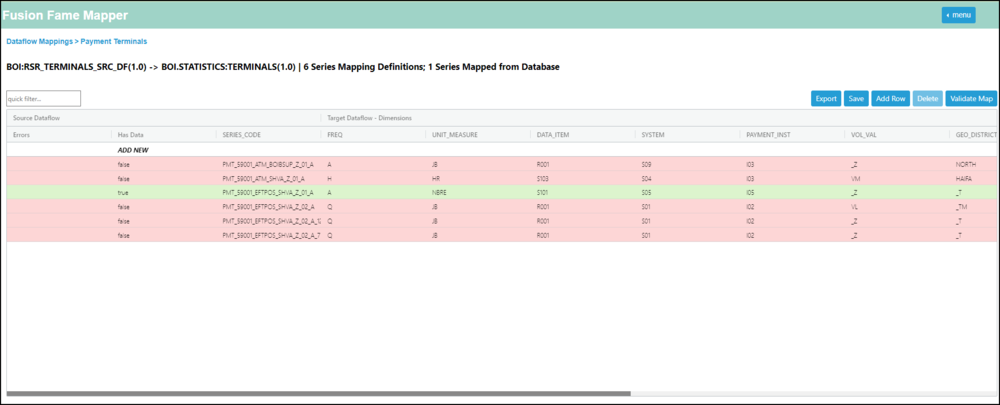
Once you have completed your editing, it is wise to Validate the map but you must Save any changes first. In order to use the Validate option you need to have published data in both of the source and target dataflows.
Example Map prior to editing.
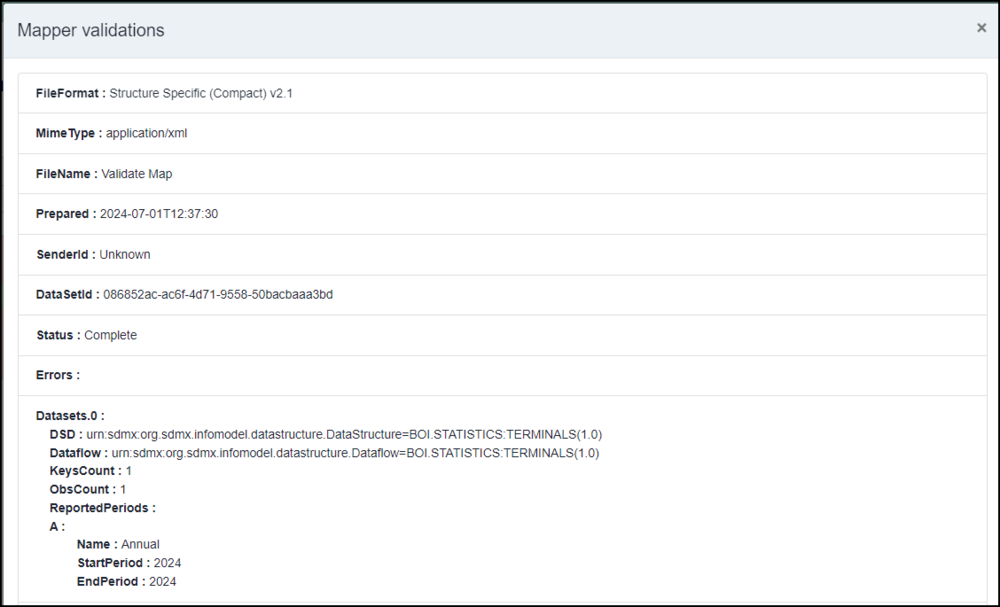
On clicking Validate, a validation report will appear as shown in the example below.
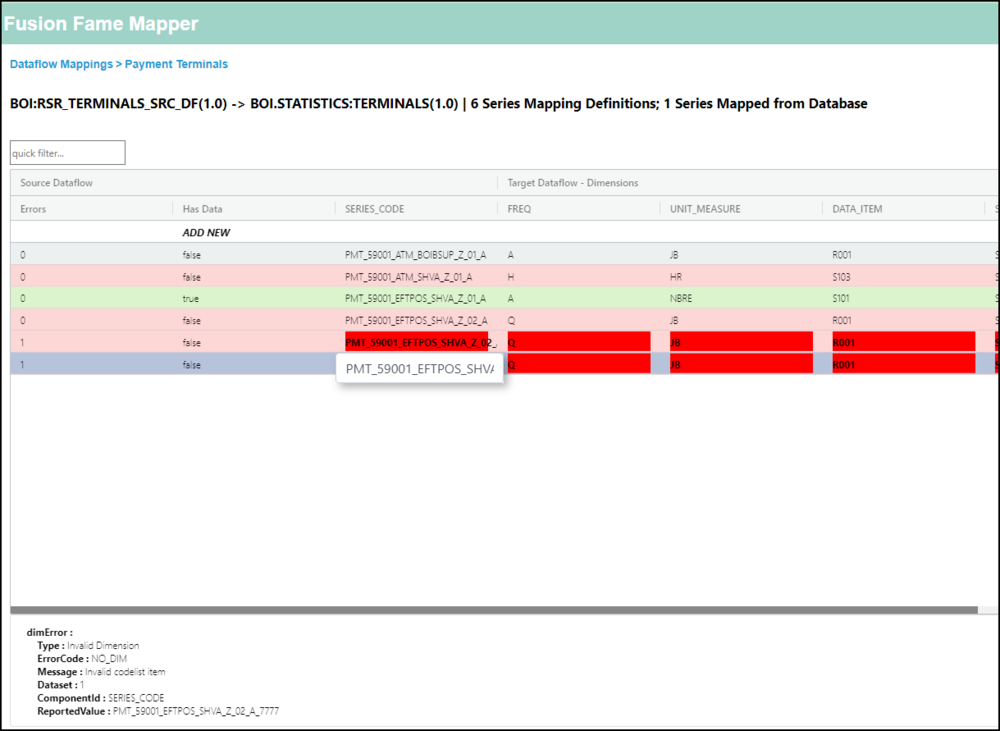
When you close the report and return to the View page, rows with errors will be highlighted in red. The number of errors will also be displayed, click on the row to see more information at the foot of the page.
Saving Changes
- To preserve changes, click Save. After using Save, the Structure and Representation Maps will be updated in Fusion Registry.
- Duplication check takes place at this stage. In case any duplication is found then a message listing all duplicated values will appear.
- If any errors are found, a notification will be displayed.
- If you select Export the contents of the Excel sheet will not reflect the ongoing changes unless they are saved.
Operating procedures using Version 1.0
Fusion Fame Mapper has functions for adding and removing mapped dataflows, maintaining the mapping rules for each mapped dataflow, and viewing the rules.
Maintenance of mapping rules is performed by exporting the rules to Excel where they can be modified before reloading the workbook using Fusion Registry's normal structural metadata submission process. Users maintaining mapping rules must therefore have structure write permissions.
Add a new mapped dataflow
Use this procedure to create a new, empty mapped dataflow.
Step 1 Create a Dataflow structure for the mapped dataflow
If it does not already exist, use Fusion Registry to create the output Dataflow with the required multi-dimensional structure.
You should also add a Data Provider on Step 3 of the Dataflow Wizard
Step 2 Add a dataflow mapping
Use the Add button to add a new dataflow mapping
The Mapped Source is an existing dataflow linked to data store which follows the Fame model of a single dimension called SERIES_CODE or similar. The list shows just dataflows in the Registry with a single dimension.
The Mapped Target is the multi-dimensional dataflow. The list shows just dataflows in the Registry with multiple dimensions.
Step 3 Export the mapping
Please refer to the following section which describes how to create your first mapping
Create and maintain the series mapping rules for a mapped dataflow
A mapped dataflow consists of a list of rules describing the dimension and attributes values for its series which are maintained using Excel.
Step 1 Export the dataflow mapping to Excel
Select the dataflow mapping from the list and export the list of rules to an Excel workbook using the Export button.
Search the list of dataflows using the quick filter.
Step 2 Add and modify series mapping rules in the Excel workbook
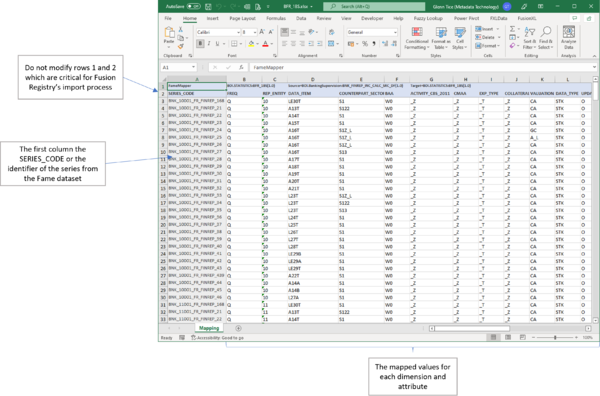
The Excel workbook has one row per series with the first column the SERIES_CODE or identifier of the Fame series to be mapped. The remaining columns are the dimensions and attributes for the series in the multi-dimensional mapped dataflow.
Do not modify rows 1 and 2 which contain information needed by Fusion Registry.
![]() Implicity mapped dimensions and attributes do not appear in the Excel export
Implicity mapped dimensions and attributes do not appear in the Excel export
Dimensions and attributes that have the same ID in both the source and target dataflows are implicitly mapped and do not appear in the Excel export.The values for those dimensions and attributes are automatically copied from the source to the target. For instance, both dataflows may have a SERIES_CODE dimension and a SERIES_CONF attribute. Neither of those components will appear in the mapped values columns of the Excel workbook but each target series will have the SERIES_CODE and SERIES_CONF values from the source.
Step 3 Import the modified dataflow mapping Excel into Fusion Registry
Import the Excel workbook using the Fusion Registry ![]() function.
function.
View the series mapping rules for a mapped dataflow
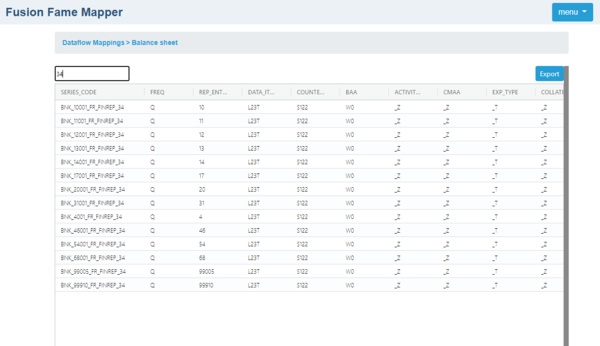
Use the View button to examine the series mapping rules for the select dataflow mapping. The Export button exports the mapping rules to Excel if modifications are needed.
Search for specific series using the filter. The example below filters for series where the SERIES_CODE contains '34'.
