Difference between revisions of "Load example datasets"
(→Overview) |
(→Load the TRD External Trade data) |
||
| (25 intermediate revisions by 2 users not shown) | |||
| Line 1: | Line 1: | ||
| + | [[Category:How_To]] | ||
=Overview= | =Overview= | ||
Fusion Registry is a 'virtual statistical data warehouse' meaning that the data it contains can either be loaded and held in storage managed by Fusion Registry, or retrived dynamically from external sources like SQL databases, SDMX REST web services or files. | Fusion Registry is a 'virtual statistical data warehouse' meaning that the data it contains can either be loaded and held in storage managed by Fusion Registry, or retrived dynamically from external sources like SQL databases, SDMX REST web services or files. | ||
| − | In this example, we are going to load some data from the ECB's | + | In this example, we are going to load some data from the ECB's TRD - External Trade dataset into SQL database storage managed by Fusion Registry. |
| + | |||
| + | This example assumes that you have already loaded the Dataflow for the ECB's External dataflow TRD (1.) as discussed [https://wiki.sdmxcloud.org/Load_example_SDMX_structures in this article]. | ||
We first need to prepare the Dataflow to receive data: | We first need to prepare the Dataflow to receive data: | ||
| Line 10: | Line 13: | ||
* Link the Provision Agreement to the MySQL database connection | * Link the Provision Agreement to the MySQL database connection | ||
| − | Once the Dataflow has been prepared, the data will be loaded directly from Metadata Technology's Fusion Registry | + | Once the Dataflow has been prepared, the data will be loaded directly from Metadata Technology's Fusion Registry demonstration service. |
=Add a database connection for data storage= | =Add a database connection for data storage= | ||
| Line 32: | Line 35: | ||
=Create an SDMX Data Provider= | =Create an SDMX Data Provider= | ||
| − | + | * Login to the admin account (if not already logged in) | |
| − | * Login to the admin account | ||
* From the left-hand menu choose <code>Organisations</code> > <code>Data Providers</code> | * From the left-hand menu choose <code>Organisations</code> > <code>Data Providers</code> | ||
* Choose the [[File:Cogs.PNG|30px]] 'cogs' button and select <code>Create Data Provider</code> | * Choose the [[File:Cogs.PNG|30px]] 'cogs' button and select <code>Create Data Provider</code> | ||
| Line 45: | Line 47: | ||
=Create an SDMX Provision Agreement= | =Create an SDMX Provision Agreement= | ||
| − | [[File: | + | [[File:Choose Data Provider.png|thumbnail]] |
| − | * Login to the admin account | + | * Login to the admin account (if not already logged in) |
* From the left-hand menu choose <code>Data</code> > <code>Dataflows</code> | * From the left-hand menu choose <code>Data</code> > <code>Dataflows</code> | ||
| − | * Select the ' | + | * Select the 'TRD' EXB External Trade Dataflow from the list |
* Choose the [[File:Cogs.PNG|30px]] 'cogs' button and select <code>Edit Selected Dataflow</code> | * Choose the [[File:Cogs.PNG|30px]] 'cogs' button and select <code>Edit Selected Dataflow</code> | ||
* On the Dataflow Wizard, use the <code>Next</code> button to move to Step 3 - Data Providers | * On the Dataflow Wizard, use the <code>Next</code> button to move to Step 3 - Data Providers | ||
| Line 54: | Line 56: | ||
* When the Choose Data Providers window appears, check the MYDP Data Provider and choose the <code>Add</code> button | * When the Choose Data Providers window appears, check the MYDP Data Provider and choose the <code>Add</code> button | ||
* Back on the Dataflow Wizard, choose the <code>Finish</code> button to save the changes | * Back on the Dataflow Wizard, choose the <code>Finish</code> button to save the changes | ||
| + | |||
| + | =Link the Provision Agreement to the database connection= | ||
| + | [[File:PA Select Data Source.png|thumbnail]] | ||
| + | * Login to the admin account (if not already logged in) | ||
| + | * From the left-hand menu choose <code>Data</code> > <code>Provision Agreements</code> | ||
| + | * Select the 'EXR_SDMX_MYDP' Provision Agreement from the list | ||
| + | * Locate the <code>Linked Data Source</code> field at the bottom of the page - choose 'MYSQL_LOCAL' in the select box, and click the <code>Apply</code> button | ||
| + | |||
| + | =Load the TRD External Trade data= | ||
| + | [[File:LoadDataFromUrl.PNG|thumbnail]] | ||
| + | * Login to the admin account (if not already logged in) | ||
| + | * From the left-hand menu choose <code>Data</code> > <code>Load Data</code> | ||
| + | * On the Load Data page: | ||
| + | ** Data Source: Load from URL | ||
| + | ** Data Format: Auto Detect | ||
| + | ** Data Structure: Auto Detect | ||
| + | ** Data URL: https://demo11.metadatatechnology.com/FusionRegistry/sdmx/v2/data/dataflow/ECB/TRD/1.0/?format=sdmx-compact-2.1 | ||
| + | ** Choose the <code>Load Data</code> button | ||
| + | |||
| + | The load process may take around 60 seconds while the data is retrieved from the demonstration web service and validated. Once loaded, the Dataset Details page shows the result of the validation, for instance whether the data is semantically compliant (the values comply with the rules specified in the Data Structure). You may see some Time Period Format errors which can be safely ignored. | ||
| + | |||
| + | The loaded data now needs to be published to the TRD Dataflow. | ||
| + | * Still on the Dataset Details page, locate the <code>Provision Agreement</code> field and choose the 'ECB:TRD_SDMX_MYDP(1.0) - My Data Provider for External Trade' Provision Agreement from the select box | ||
| + | * Under <code>Action</code>, choose the <code>Re-Verify Data</code> button - this rechecks the data for compliance with any SDMX Reporting Constraints that may be defined for the Provision Agreement | ||
| + | * Choose the <code>Publish Data</code> button | ||
| + | * In the Publish Data popup, choose <code>Append</code> as the Action, and click the <code>Upload</code> button | ||
| + | * You should receive a notification that the data has been successfully published | ||
Latest revision as of 05:58, 8 August 2023
Contents
Overview
Fusion Registry is a 'virtual statistical data warehouse' meaning that the data it contains can either be loaded and held in storage managed by Fusion Registry, or retrived dynamically from external sources like SQL databases, SDMX REST web services or files.
In this example, we are going to load some data from the ECB's TRD - External Trade dataset into SQL database storage managed by Fusion Registry.
This example assumes that you have already loaded the Dataflow for the ECB's External dataflow TRD (1.) as discussed in this article.
We first need to prepare the Dataflow to receive data:
- Add a connection to our MySQL database to store the data
- Create an SDMX Data Provider - this is the 'organisation' under which the data will be submitted under the SDMX Data Collection model
- Create an SDMX Provision Agreement - this is the SDMX structure which authorises the Data Provider to submit data to the Dataflow
- Link the Provision Agreement to the MySQL database connection
Once the Dataflow has been prepared, the data will be loaded directly from Metadata Technology's Fusion Registry demonstration service.
Add a database connection for data storage
- Login to the admin account
- From the left-hand menu choose
Admin>Data Manager - Choose the
 'cogs' button and select
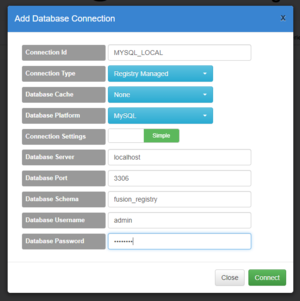
 Add Database Connectionfrom the menu - Use the following settings:
- Connection Id: MYSQL_LOCAL
- Connection Type: Registry Managed
- Database Cache: None
- Database Platform: MySQL
- Connection Settings: Simple
- Database Server: localhost
- Database Port: 3306
- Database Schema: fusion_registry (or the name of the schema you created)
- Database Username: (the name of the database user with access to the schema)
- Database Password: (the password for that database user)
The 'MYSQL_LOCAL' connection Id will be used later when configuring the Provision Agreement.
Create an SDMX Data Provider
- Login to the admin account (if not already logged in)
- From the left-hand menu choose
Organisations>Data Providers - Choose the
 'cogs' button and select
 Create Data Provider - Under the 1 Details step of the wizard:
- Id: MYDP
- Language: en (this is the language for the Name and Description - you can choose other languages, but we will work with English for now)
- Owning Agency: SDMX
- Name: My Data Provider (you can choose any name you like)
- Description: A test Data Provider (again, you can choose your own description)
- Choose the
Finishbutton
Create an SDMX Provision Agreement
- Login to the admin account (if not already logged in)
- From the left-hand menu choose
Data>Dataflows - Select the 'TRD' EXB External Trade Dataflow from the list
- Choose the
 'cogs' button and select
 Edit Selected Dataflow - On the Dataflow Wizard, use the
Nextbutton to move to Step 3 - Data Providers - Use the
 button to add a new Data Provider for the Dataflow
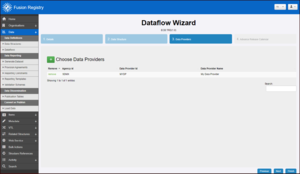
 - When the Choose Data Providers window appears, check the MYDP Data Provider and choose the
Addbutton - Back on the Dataflow Wizard, choose the
Finishbutton to save the changes
Link the Provision Agreement to the database connection
- Login to the admin account (if not already logged in)
- From the left-hand menu choose
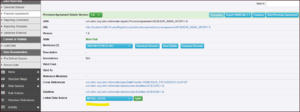
Data>Provision Agreements - Select the 'EXR_SDMX_MYDP' Provision Agreement from the list
- Locate the
Linked Data Sourcefield at the bottom of the page - choose 'MYSQL_LOCAL' in the select box, and click theApplybutton
Load the TRD External Trade data
- Login to the admin account (if not already logged in)
- From the left-hand menu choose
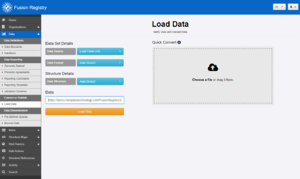
Data>Load Data - On the Load Data page:
- Data Source: Load from URL
- Data Format: Auto Detect
- Data Structure: Auto Detect
- Data URL: https://demo11.metadatatechnology.com/FusionRegistry/sdmx/v2/data/dataflow/ECB/TRD/1.0/?format=sdmx-compact-2.1
- Choose the
Load Databutton
The load process may take around 60 seconds while the data is retrieved from the demonstration web service and validated. Once loaded, the Dataset Details page shows the result of the validation, for instance whether the data is semantically compliant (the values comply with the rules specified in the Data Structure). You may see some Time Period Format errors which can be safely ignored.
The loaded data now needs to be published to the TRD Dataflow.
- Still on the Dataset Details page, locate the
Provision Agreementfield and choose the 'ECB:TRD_SDMX_MYDP(1.0) - My Data Provider for External Trade' Provision Agreement from the select box - Under
Action, choose theRe-Verify Databutton - this rechecks the data for compliance with any SDMX Reporting Constraints that may be defined for the Provision Agreement - Choose the
Publish Databutton - In the Publish Data popup, choose
Appendas the Action, and click theUploadbutton - You should receive a notification that the data has been successfully published


