Difference between revisions of "Downlad and Installation FXLData"
(→Installation) |
|||
| Line 10: | Line 10: | ||
''FXLData.xlam'' | ''FXLData.xlam'' | ||
| − | The file should be copied into the | + | The file should be copied into the Addins folder. This folder allows for plugins to be provided to a single location, but they can be separately enabled or disabled from within Microsoft Excel. Using the Addins folder requires two steps: |
| − | 1. Copying the file into the | + | |
| + | 1. Copying the file into the Addins folder | ||
2. Enabling the FXLData add-in from within Excel | 2. Enabling the FXLData add-in from within Excel | ||
| − | First, you will need to locate your | + | First, you will need to locate your Addins folder. On Windows 11, this is located under your home folder in the following location: |
| − | C:\Users\[your user name]\AppData\Roaming\Microsoft\ | + | C:\Users\[your user name]\AppData\Roaming\Microsoft\Addins |
'''Note''': this folder may be in a different location on different versions of Windows and in non-standard installations. Please check with your system administrator if you cannot find this folder. | '''Note''': this folder may be in a different location on different versions of Windows and in non-standard installations. Please check with your system administrator if you cannot find this folder. | ||
| − | |||
| − | |||
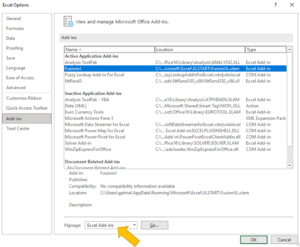
| + | Copy the file FXLData.xlam file into this directory and then launch Excel. From within Excel, open the '''Developer''' tab, and select '''Excel Add-Ins'''. You will see a list of your available Addins, select FXLData and click OK. | ||
| − | |||
After clicking ‘OK’ the Add-Ins window will close and the ‘FusionXL’ tab will be added to the Excel Ribbon. This tab will be available on all subsequent launches of Excel from this computer, unless the add-in is disabled from the add-ins menu (or the .xlam file is deleted from the file system). | After clicking ‘OK’ the Add-Ins window will close and the ‘FusionXL’ tab will be added to the Excel Ribbon. This tab will be available on all subsequent launches of Excel from this computer, unless the add-in is disabled from the add-ins menu (or the .xlam file is deleted from the file system). | ||
The resulting FusionXL tab will be displayed in the Ribbon | The resulting FusionXL tab will be displayed in the Ribbon | ||
| − | |||
| − | |||
| − | |||
| − | |||
| − | |||
| − | |||
| − | |||
Revision as of 07:48, 18 July 2024
Downloading FXL Data
To download the latest version of FXLData you need access to the Regnology Customer Portal. If you do not already have an account OR if you are having difficulty finding FXL data, please send an email to:
ce-val.murrell@regnology.net
Installation
The FXLData add-in is distributed as a single Excel file:
FXLData.xlam
The file should be copied into the Addins folder. This folder allows for plugins to be provided to a single location, but they can be separately enabled or disabled from within Microsoft Excel. Using the Addins folder requires two steps:
1. Copying the file into the Addins folder 2. Enabling the FXLData add-in from within Excel
First, you will need to locate your Addins folder. On Windows 11, this is located under your home folder in the following location:
C:\Users\[your user name]\AppData\Roaming\Microsoft\Addins
Note: this folder may be in a different location on different versions of Windows and in non-standard installations. Please check with your system administrator if you cannot find this folder.
Copy the file FXLData.xlam file into this directory and then launch Excel. From within Excel, open the Developer tab, and select Excel Add-Ins. You will see a list of your available Addins, select FXLData and click OK.
After clicking ‘OK’ the Add-Ins window will close and the ‘FusionXL’ tab will be added to the Excel Ribbon. This tab will be available on all subsequent launches of Excel from this computer, unless the add-in is disabled from the add-ins menu (or the .xlam file is deleted from the file system).
The resulting FusionXL tab will be displayed in the Ribbon
