Difference between revisions of "Validate data"
(→Provision Agreement) |
(→Creating the Validation Scheme from the User Interface) |
||
| (8 intermediate revisions by the same user not shown) | |||
| Line 22: | Line 22: | ||
A Dataflow is a structure on which data is collected and disseminated. A Dataflow references a Data Structure Definition (DSD) which is used as the underlying template to which the data must conform. | A Dataflow is a structure on which data is collected and disseminated. A Dataflow references a Data Structure Definition (DSD) which is used as the underlying template to which the data must conform. | ||
| − | [https:// | + | [https://wiki.sdmxcloud.org/Dataflow_-_Structural_Metadata_Management You can read more about Dataflows in this article]. An example Dataflow is shown below. |
| Line 37: | Line 37: | ||
To successfully validate, the data must adhere to the SDMX standard in terms of format as well as what has been defined in the the Data Structure. | To successfully validate, the data must adhere to the SDMX standard in terms of format as well as what has been defined in the the Data Structure. | ||
| − | [https:// | + | [https://wiki.sdmxcloud.org/Data_Structure_Definition_(DSD)_-_Structural_Metadata_Management You can read more about Data Structures in this article]. |
| − | [https:// | + | [https://wiki.sdmxcloud.org/Create_a_simple_DSD You can read more about how to create a simple Data Structures in this article]. |
'''Supported formats are:''' | '''Supported formats are:''' | ||
| Line 53: | Line 53: | ||
[[File:LOADINGDATA.mp4]]<br> | [[File:LOADINGDATA.mp4]]<br> | ||
| + | |||
| Line 62: | Line 63: | ||
[[File:val6.PNG|850px]]<br> | [[File:val6.PNG|850px]]<br> | ||
| + | |||
| + | =Validation Scheme= | ||
| + | ==What is a Validation Scheme?== | ||
| + | Validation Schemes define one or more validation rules which can be executed against a Dataflow at the data validation stage of a data load. Each validation rule consists of a mathematical expression or a link to an aggregation hierarchy which is used to create an expression. This validation goes beyond syntactical and semantical validation of the dataset and is instead checking that the values supplied in the dataset conform to specific business rules. Examples of this could be that a particular field must have a value less than 100, or that the total value reported must be the same as the total of a set of other observation values. | ||
| + | |||
| + | |||
| + | [[File:Valid1.PNG|850px]]<br> | ||
| + | |||
| + | A Validation Scheme must be assigned against a single Dataflow and may consist of one or many validation rules. A single Validation Rule consists of: | ||
| + | |||
| + | * an ID and name | ||
| + | * an optional description | ||
| + | * a type: either a custom expression or a hierarchic expression | ||
| + | * a result type (either numerical or code type) and a value (e.g. 100 or GDP) | ||
| + | * an equality operator ( one of the following mathematical operators: =, <>, <, <=, >, >= ) | ||
| + | * an expression (e.g. [EUR]+[FR] ) | ||
| + | |||
| + | The Validation Scheme rules will be applicable to all datasets submitted against the Dataflow the Validation Scheme is linked to. | ||
| + | |||
| + | ==How are Rules Applied== | ||
| + | |||
| + | A validation rule operates on a single dimension, an example of a rule to calculate Total from the inputs Males and Females would look like the following: | ||
| + | |||
| + | [T] = [M] + [F] | ||
| + | |||
| + | '''Note''': the syntax used in a validation scheme puts code Ids into square brackets. | ||
| + | |||
| + | This rule would be applied to every series where all other parts of the series key match, so the following series there would be two matches to this rule, one for employment, and one for unemployment. | ||
| + | |||
| + | |||
| + | [[File:Valid2.PNG|850px]]<br> | ||
| + | |||
| + | For a validation rule to be executed there must be data reported for the output, and at least one of the inputs. If data are missing in the inputs, then they are treated a zero values. In the following example, only 1 rule is matched, and there is only one input (Male). | ||
| + | |||
| + | |||
| + | [[File:Valid3.PNG|850px]]<br> | ||
| + | |||
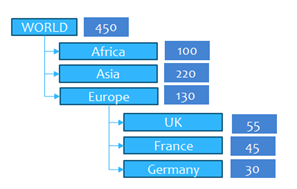
| + | There are two types of validation rules, ones which use a custom written expression, as described above. The second type references a Hierarchy in the Registry, and the Hierarchy is used as the basis for an Aggregation expression. For example the following image shows a hierarchy of countries, against theoretical reported values. This is an example of a hierarchy being used to validate a dataset. | ||
| + | A hierarchy can be applied to any dimension that uses the same Codelist as the Hierarchy. When values are read in the data file, the totals at each sub-hierarchy are summed up to ensure they are consistent with the parent value. If any values are missing data, they are treated as having a value of zero. | ||
| + | |||
| + | |||
| + | [[File:Valid4.PNG|600px]]<br> | ||
| + | |||
| + | '''Note''': the Registry only checks data in the submitted file, and does not cross check against any persisted data when validating. For example if you have already stored the totals in a Registry database, submitting a Dataset containing the values making up the totals, the Registry will not validate from the file against the totals already stored. | ||
| + | |||
| + | =Validation Scheme Tutorial= | ||
| + | This tutorial describes the manual steps in the process to create a Validation Scheme. It is required that your Registry be populated with structures that support this process (such as Data Structure Definitions and Dataflows). | ||
| + | |||
| + | ==Overview== | ||
| + | This section will explain the creation of a simple Validation Scheme that demonstrates when Data is loaded into the Registry that the rules within the scheme will be used for validation purposes. | ||
| + | |||
| + | ==Creating the Validation Scheme from the User Interface== | ||
| + | A Validation Scheme is created or maintained by using the authoring Wizard. The cogs icon, used to open the wizard is only available to authenticated Agency or Admin users. | ||
| + | |||
| + | |||
| + | [[File:Valid5.PNG|850px]]<br> | ||
| + | |||
| + | There are four steps to creating a Validation Scheme and are described in the following sections: | ||
| + | |||
| + | ===Step 1: Details=== | ||
| + | The first step allows for the specification of the ID and other associated high-level values which make up the definition of the Validation Scheme. | ||
| + | |||
| + | |||
| + | [[File:Valid6.PNG|600px]]<br> | ||
| + | |||
| + | Like all other SDMX Structures, the Id, Version, Name and Agency are mandatory, and the other values are optional. Enter these values and click on the '''Next''' button. | ||
| + | |||
| + | ===Step 2: Attachment=== | ||
| + | This step assigns the Validation Scheme to a single Dataflow. | ||
| + | |||
| + | |||
| + | [[File:Valid7.PNG|600px]]<br> | ||
| + | |||
| + | Click on the Dataflow field which will show all of the Dataflows in the Registry. Select the Dataflow to attach this Scheme to and its details will be displayed in the lower half of this page. | ||
| + | |||
| + | Click on the '''Next''' button once the correct Dataflow has been selected. | ||
| + | |||
| + | ===Step 3: CSV Import=== | ||
| + | This step is optional and allows for the creation of a number of validation rules via text entry. | ||
| + | |||
| + | |||
| + | [[File:Valid8.PNG|600px]]<br> | ||
| + | |||
| + | To create a rule, enter the rule details on its own line in the text area. Elements of the rule must be separated by commas. Each element must conform to the expected value of that field (e.g. the ID element must not contain illegal characters; the equality operator may only be one of the permitted values). The field order is determined by the drop-downs at the top of this step and can be changed by the user. | ||
| + | |||
| + | Syntax of an Expression: | ||
| + | |||
| + | Each expression operates on a single dimension, and is made up of three parts: | ||
| + | |||
| + | # Resultant<br> | ||
| + | # | ||
| + | # Equality Operator<br> | ||
| + | # | ||
| + | # Operands and Operators<br> | ||
| + | |||
| + | The resultant and operands can either be numerical constants (e.g 100) or the Id of a code (e.g EUROPE). If a code id is used, the syntax demands it is placed in square brackets [EUROPE]. | ||
| + | |||
| + | For example an expression to validate the reported value for EUROPE may look like the following: | ||
| + | |||
| + | ''[EUROPE]=([UK]+[FR]+[DE]) - (([ES]+[IT]+[LUX]) * 2)'' | ||
| + | |||
| + | When importing this via CSV the output, equality operator, and expression are all supplied in their own CSV field. So a full example of a CSV rule would look like the following: | ||
| + | |||
| + | ''SERIES_CHECK,Europe Total,REF_AREA,[EUROPE],=,"([UK]+[FR]+[DE]) - (([ES]+[IT]+[LUX]) * 2)"'' | ||
| + | |||
| + | This would create the rule with the following characteristics: | ||
| + | * Rule Id: SERIES_CHECK | ||
| + | * Rule Name: Europe Total | ||
| + | * Rule Description: <none> (no column index supplied) | ||
| + | * Dimension Id: REF_AREA | ||
| + | * Mathematical expression: EUROPE = (UK+FR+DE) - ((ES+IT+LUX) * 2) | ||
| + | |||
| + | ===Step 4: Expression Builder=== | ||
| + | Rather than use the CSV import (step 3) to create a validation rule, it may be easier to create a validation rule through the user interface on step 4. | ||
| + | |||
| + | |||
| + | [[File:Valid9.PNG|600px]]<br> | ||
| + | |||
| + | The left-hand side of the page shows all dimensions for this Dataflow followed by a number. The number indicates the number of Validation Rules against that particular dimension. The right-hand side shows the rules that have been defined for the currently selected Dimension. Selecting a rule shows the expression for that rule (i.e. the logic of the rule itself) or if this is a hierarchical rule then the aggregation hierarchy is displayed. | ||
| + | |||
| + | Editing or creating a rule displays a dialog where the values for the rule can be defined. This is similar to step 3 of the Validation Scheme Wizard. | ||
| + | |||
| + | |||
| + | [[File:Valid10.PNG|600px]]<br> | ||
| + | |||
| + | As stated previously a rule must have an Id and Name and may have an optional description. The control at top-right allows the user to distinguish between a Custom Expression and a Hierarchical Expression (this choice is only available for Dimensions with a Concept that represents a Hierarchic codelist). | ||
| + | |||
| + | The Mathematical Expression can be defined as either a Code evaluated against an expression (e.g. EUROPE=FR+DE) or a value evaluated against an expression (e.g. 55 >= GE). The expression area may be typed into manually and the user will need to do this in order to add mathematical symbols and numbers as appropriate. However the Quick Code Lookup, situated at the bottom of this page, lists all of the codes for this Dimension. Clicking an item in this list will insert it into the expression area. | ||
| + | |||
| + | For Hierarchic Rules, these can only be created when the Codelist referenced by the Dimension is also referenced by a Hierarchy – this permits the Rule Type option of Aggregate Using Hierarchy to be selected. If no hierarchies exist which use the same Codelist as the Dimension, the Rule Type option will be fixed on Custom Rule. | ||
| + | |||
| + | When the rule type is set to Aggregate using Hierarchy the result and expression section of the dialog is replaced with a list of available Hierarchies that can be selected (under the heading “Hierarchy to Use”). A Hierarchy must be selected and the view of the selected hierarchy is shown to the right of the hierarchical list. | ||
| + | |||
| + | |||
| + | [[File:Valid11.PNG|600px]]<br> | ||
| + | |||
| + | Once the rule has been defined, clicking “Add Rule” will dismiss the dialog and add this rule to the selected dimension. | ||
| + | |||
| + | Note that during creation, rules are not validated for logic or contradictory values. So it is possible to create nonsensical rules such as EUROPE >= EUROPE. It is down to the user to ensure that the Validation Rules have a logical sense. | ||
Latest revision as of 09:25, 3 November 2020
Overview
To Validate Data you need to have the following structures in place.
Preparation
Data Provider
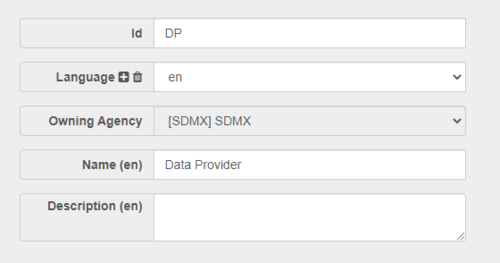
A Data Provider is an Organisation Type. When a Provision Agreement is created a Dataflow and a DataProvider must be present. An example Data Provider is shown below.
Provision Agreement
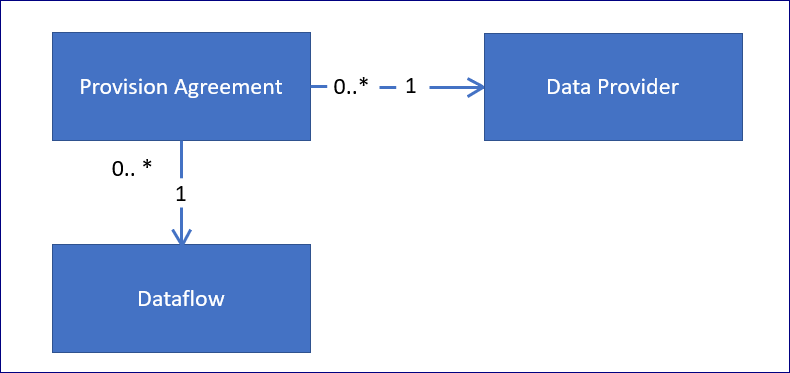
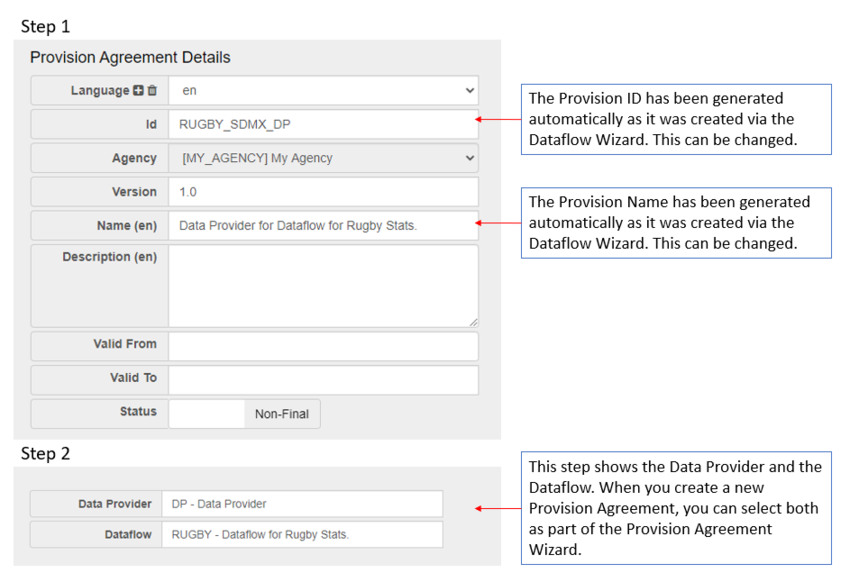
A Provision Agreement is the union of a Dataflow with a Data Provider. A Provision Agreement (PA) is a definition that the Data Provider is allowed to provide data for the Dataflow. Data is always reported by a Data Provider against the PA. You can read more about Provision Agreements in this article. An example Provision Agreement is shown below.
Dataflow
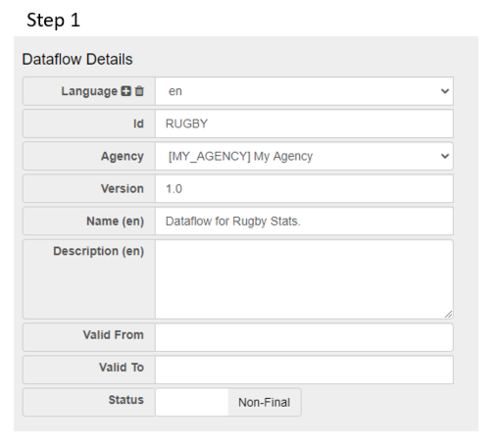
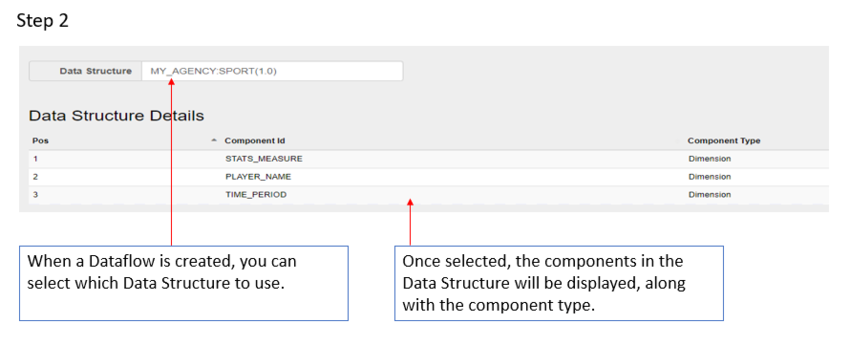
A Dataflow is a structure on which data is collected and disseminated. A Dataflow references a Data Structure Definition (DSD) which is used as the underlying template to which the data must conform. You can read more about Dataflows in this article. An example Dataflow is shown below.
Load Data
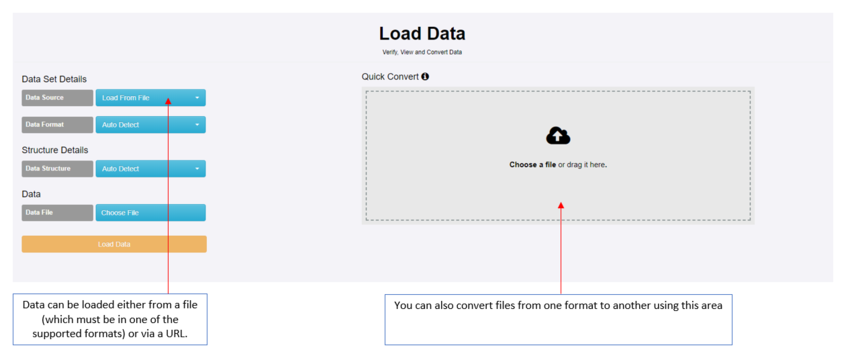
Once all the elements are in place as described above, the next step is to load the data which is done via the Convert option on the Data Menu.
Data can be loaded from a file of via a URL (for example from the Metadata Technology's Fusion Registry Demo site).
To successfully validate, the data must adhere to the SDMX standard in terms of format as well as what has been defined in the the Data Structure.
You can read more about Data Structures in this article.
You can read more about how to create a simple Data Structures in this article.
Supported formats are:
- SDMX_2.1-Generic
- SDMX-V2.0-Compact
- SDMX-EDI
- SDMX-JSON
- SDMX-V2.0-Generic
To see this process in action you can watch this video
Validate Data
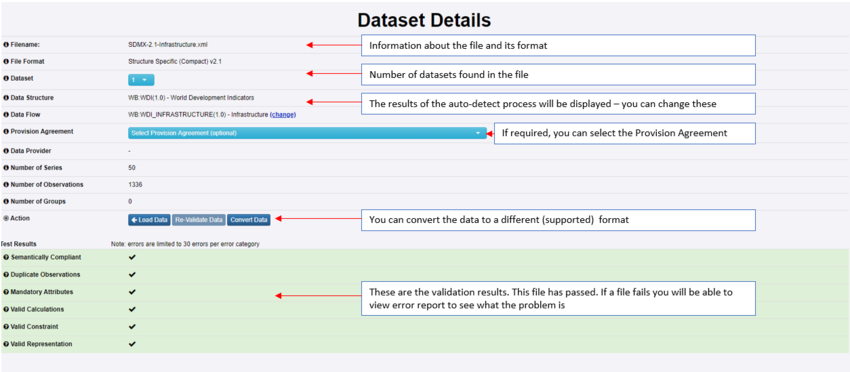
Click Load Data to start the validation process as explained in the image below.
Validation Scheme
What is a Validation Scheme?
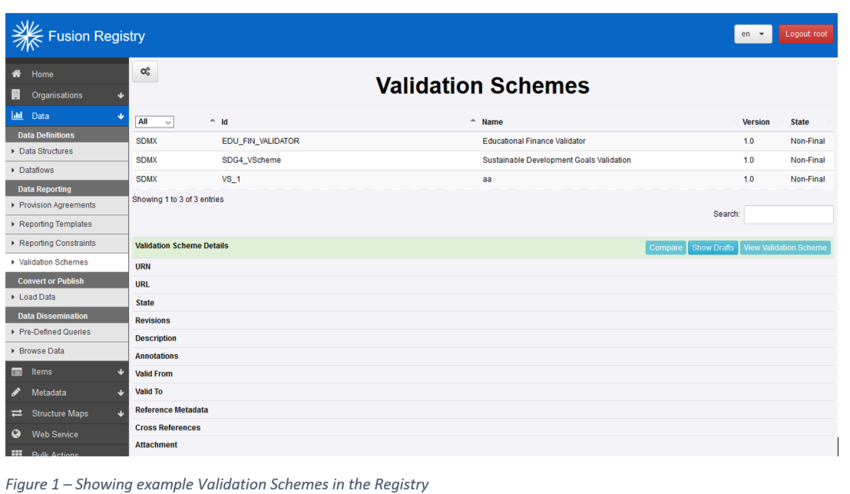
Validation Schemes define one or more validation rules which can be executed against a Dataflow at the data validation stage of a data load. Each validation rule consists of a mathematical expression or a link to an aggregation hierarchy which is used to create an expression. This validation goes beyond syntactical and semantical validation of the dataset and is instead checking that the values supplied in the dataset conform to specific business rules. Examples of this could be that a particular field must have a value less than 100, or that the total value reported must be the same as the total of a set of other observation values.
A Validation Scheme must be assigned against a single Dataflow and may consist of one or many validation rules. A single Validation Rule consists of:
- an ID and name
- an optional description
- a type: either a custom expression or a hierarchic expression
- a result type (either numerical or code type) and a value (e.g. 100 or GDP)
- an equality operator ( one of the following mathematical operators: =, <>, <, <=, >, >= )
- an expression (e.g. [EUR]+[FR] )
The Validation Scheme rules will be applicable to all datasets submitted against the Dataflow the Validation Scheme is linked to.
How are Rules Applied
A validation rule operates on a single dimension, an example of a rule to calculate Total from the inputs Males and Females would look like the following:
[T] = [M] + [F]
Note: the syntax used in a validation scheme puts code Ids into square brackets.
This rule would be applied to every series where all other parts of the series key match, so the following series there would be two matches to this rule, one for employment, and one for unemployment.
For a validation rule to be executed there must be data reported for the output, and at least one of the inputs. If data are missing in the inputs, then they are treated a zero values. In the following example, only 1 rule is matched, and there is only one input (Male).
There are two types of validation rules, ones which use a custom written expression, as described above. The second type references a Hierarchy in the Registry, and the Hierarchy is used as the basis for an Aggregation expression. For example the following image shows a hierarchy of countries, against theoretical reported values. This is an example of a hierarchy being used to validate a dataset. A hierarchy can be applied to any dimension that uses the same Codelist as the Hierarchy. When values are read in the data file, the totals at each sub-hierarchy are summed up to ensure they are consistent with the parent value. If any values are missing data, they are treated as having a value of zero.
Note: the Registry only checks data in the submitted file, and does not cross check against any persisted data when validating. For example if you have already stored the totals in a Registry database, submitting a Dataset containing the values making up the totals, the Registry will not validate from the file against the totals already stored.
Validation Scheme Tutorial
This tutorial describes the manual steps in the process to create a Validation Scheme. It is required that your Registry be populated with structures that support this process (such as Data Structure Definitions and Dataflows).
Overview
This section will explain the creation of a simple Validation Scheme that demonstrates when Data is loaded into the Registry that the rules within the scheme will be used for validation purposes.
Creating the Validation Scheme from the User Interface
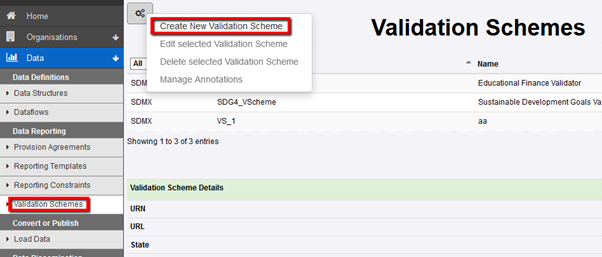
A Validation Scheme is created or maintained by using the authoring Wizard. The cogs icon, used to open the wizard is only available to authenticated Agency or Admin users.
There are four steps to creating a Validation Scheme and are described in the following sections:
Step 1: Details
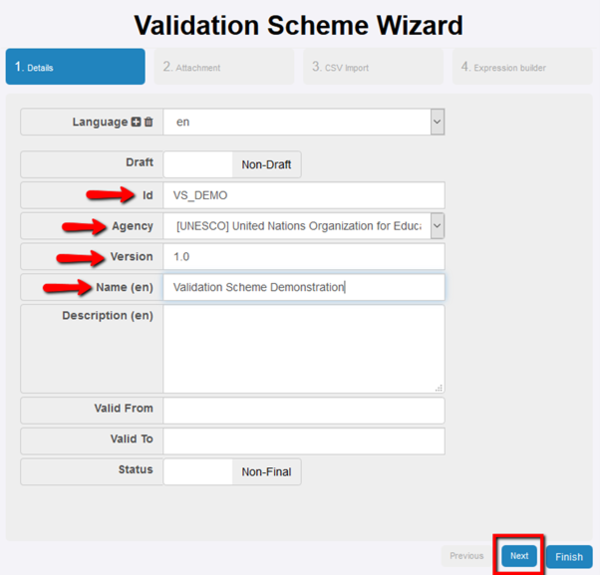
The first step allows for the specification of the ID and other associated high-level values which make up the definition of the Validation Scheme.
Like all other SDMX Structures, the Id, Version, Name and Agency are mandatory, and the other values are optional. Enter these values and click on the Next button.
Step 2: Attachment
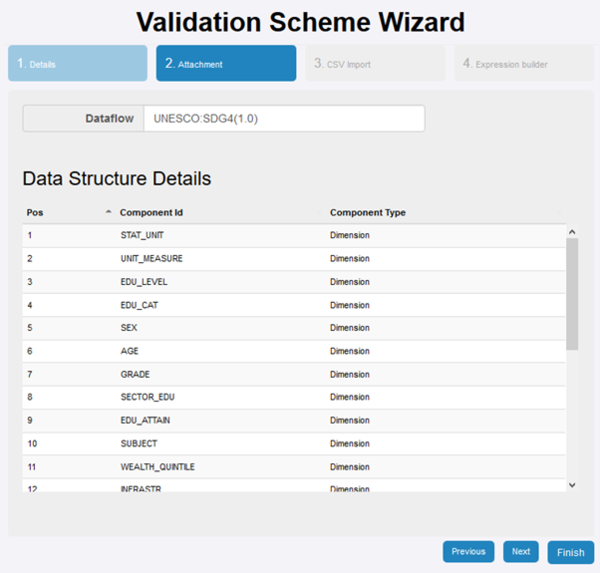
This step assigns the Validation Scheme to a single Dataflow.
Click on the Dataflow field which will show all of the Dataflows in the Registry. Select the Dataflow to attach this Scheme to and its details will be displayed in the lower half of this page.
Click on the Next button once the correct Dataflow has been selected.
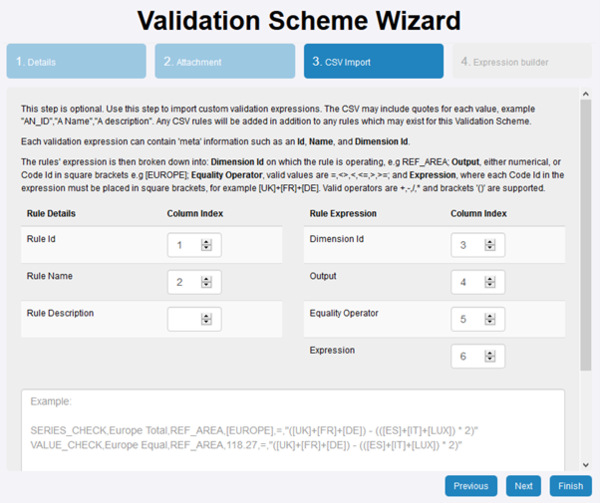
Step 3: CSV Import
This step is optional and allows for the creation of a number of validation rules via text entry.
To create a rule, enter the rule details on its own line in the text area. Elements of the rule must be separated by commas. Each element must conform to the expected value of that field (e.g. the ID element must not contain illegal characters; the equality operator may only be one of the permitted values). The field order is determined by the drop-downs at the top of this step and can be changed by the user.
Syntax of an Expression:
Each expression operates on a single dimension, and is made up of three parts:
- Resultant
- Equality Operator
- Operands and Operators
The resultant and operands can either be numerical constants (e.g 100) or the Id of a code (e.g EUROPE). If a code id is used, the syntax demands it is placed in square brackets [EUROPE].
For example an expression to validate the reported value for EUROPE may look like the following:
[EUROPE]=([UK]+[FR]+[DE]) - (([ES]+[IT]+[LUX]) * 2)
When importing this via CSV the output, equality operator, and expression are all supplied in their own CSV field. So a full example of a CSV rule would look like the following:
SERIES_CHECK,Europe Total,REF_AREA,[EUROPE],=,"([UK]+[FR]+[DE]) - (([ES]+[IT]+[LUX]) * 2)"
This would create the rule with the following characteristics:
- Rule Id: SERIES_CHECK
- Rule Name: Europe Total
- Rule Description: <none> (no column index supplied)
- Dimension Id: REF_AREA
- Mathematical expression: EUROPE = (UK+FR+DE) - ((ES+IT+LUX) * 2)
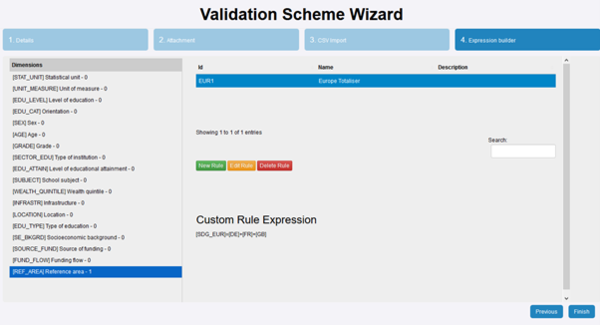
Step 4: Expression Builder
Rather than use the CSV import (step 3) to create a validation rule, it may be easier to create a validation rule through the user interface on step 4.
The left-hand side of the page shows all dimensions for this Dataflow followed by a number. The number indicates the number of Validation Rules against that particular dimension. The right-hand side shows the rules that have been defined for the currently selected Dimension. Selecting a rule shows the expression for that rule (i.e. the logic of the rule itself) or if this is a hierarchical rule then the aggregation hierarchy is displayed.
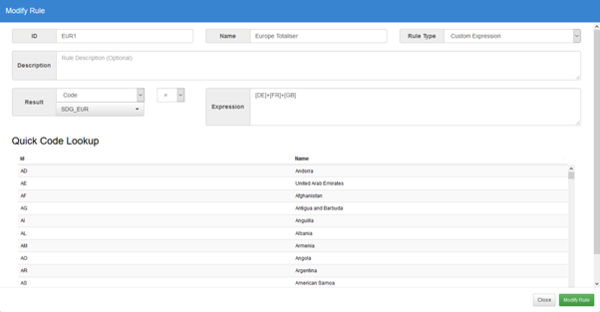
Editing or creating a rule displays a dialog where the values for the rule can be defined. This is similar to step 3 of the Validation Scheme Wizard.
As stated previously a rule must have an Id and Name and may have an optional description. The control at top-right allows the user to distinguish between a Custom Expression and a Hierarchical Expression (this choice is only available for Dimensions with a Concept that represents a Hierarchic codelist).
The Mathematical Expression can be defined as either a Code evaluated against an expression (e.g. EUROPE=FR+DE) or a value evaluated against an expression (e.g. 55 >= GE). The expression area may be typed into manually and the user will need to do this in order to add mathematical symbols and numbers as appropriate. However the Quick Code Lookup, situated at the bottom of this page, lists all of the codes for this Dimension. Clicking an item in this list will insert it into the expression area.
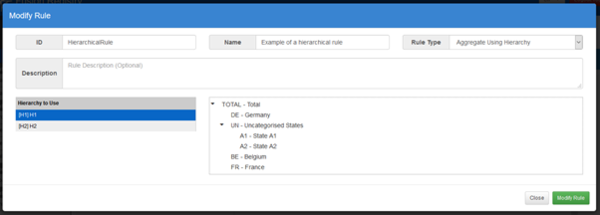
For Hierarchic Rules, these can only be created when the Codelist referenced by the Dimension is also referenced by a Hierarchy – this permits the Rule Type option of Aggregate Using Hierarchy to be selected. If no hierarchies exist which use the same Codelist as the Dimension, the Rule Type option will be fixed on Custom Rule.
When the rule type is set to Aggregate using Hierarchy the result and expression section of the dialog is replaced with a list of available Hierarchies that can be selected (under the heading “Hierarchy to Use”). A Hierarchy must be selected and the view of the selected hierarchy is shown to the right of the hierarchical list.
Once the rule has been defined, clicking “Add Rule” will dismiss the dialog and add this rule to the selected dimension.
Note that during creation, rules are not validated for logic or contradictory values. So it is possible to create nonsensical rules such as EUROPE >= EUROPE. It is down to the user to ensure that the Validation Rules have a logical sense.
