Structure Maintenance -Structural Metadata Management
To create structures in the Fusion Registry, first log into the HTML-UI as a user with either Admin or Agency permissions.
The Login button is located in the top right of the application, in the page header.


Figure 1 showing the branding bar with login and language selector
Once logged in all the pages in the Fusion Registry related to Structural Metadata will include a maintenance button as shown in the image below.
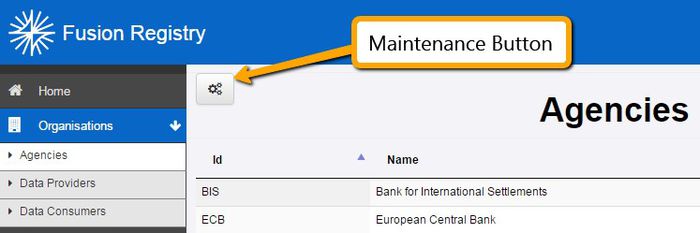

Figure 2 showing the maintenance button for authenticated users
The maintenance button will include, as a minimum, the ability to create, edit, or delete a structure. A structure must first be selected before Edit and Delete operations are enabled.
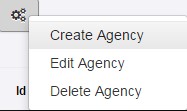

Figure 3 showing the action menu for the maintenance button
Structure Creation
The action of creating a structure will open up a wizard which provides the steps for defining the required information for the structure. Each wizard in the Fusion Registry is different depending on the structure type being created, however the first step of each wizard following a common theme, as described below.

Figure 4 showing step 1 of a structure creation Wizard
Each structure in the Fusion Registry must have an Id and a Name. All structures must also be owned by an Agency. It is the Agency who is responsible for maintaining and updating the structure. Only a user whose account is linked to the Agency is allowed to make modifications to the structure (admin users can modify structures for all Agencies). Most structures include a Version which will default the value to 1.0 if no version is defined.
Some structures may be created as a draft. Draft structures are only visible to admin users and users of the same Agency as the structure. Draft structure cannot be seen in the user interface, and web service responses by unauthenticated users. Draft structures may be published at a later date from the user interface by a user with Admin or Agency permissions (they must belong to the Agency who owns the structure).
Name and Description fields are multilingual. The first step of the wizard can be used to add new languages to the structure, which can be used in both the first step and subsequent steps when defining names and descriptions. Description fields are always optional.
Some structures include a validity period (Valid From/Valid To). This information is optional.
Some structures also include a Status, which can be set to either Final or Non-Final. Final structures indicate to the user that the structure will not undergo any major modifications. The Fusion Registry enforces this rule by restricting what can be modified. Certain information in a final structure can be modified, including Names; Descriptions; Valid From/To. It is possible to remove the Final status from a structure to allow for further modification, however it should be noted that if a structure is marked as Final, it is documenting to the user that they should not expect any further changes to this structure.
Structure Modification
Structures can be modified from the Fusion Registry using the edit menu option under the maintenance button. This action opens the same Wizard used for structure creation. When modifying a structure the wizard steps are pre-populated with the details from the structure that is being modified.
Structure Deletion
Structures can be deleted from the Fusion Registry using the delete menu option under the maintenance button. To delete a structure, navigate to the appropriate page in the Fusion Registry for the structure type, select the structure in the table, and click on the maintenance button to select the Delete option.
When a structure is deleted, it is important for the Fusion Registry to ensure that no structures cross-reference the deleted structure. The Fusion Registry will check to determine if the structure marked for deletion is referenced, and if it is, the user must choose to either delete all the cross-referencing structures, or cancel the operation. If the structures to be deleted include structures owned by other Agencies, then the user must have the authority to modify these structures (i.e. they must either be an Admin user, or a user with an account linked to multiple Agencies).
Modification Details
Viewing Modification History
The Fusion Registry records all modifications to structures and makes this information available to the Agency who owns the structure.
The structure modifications can be viewed in the details section which is displayed below the table of structures.

Figure 5 showing the Dataflow Details for the selected Dataflow. This details section appears below the table containing all of the Dataflows in the Fusion Registry
An alternative approach to view structure modifications is to use the left hand menu to navigate to the Activity-> Structure Submissions page. This page shows the modifications made to each structure, and includes structures which have been subsequently deleted from the system. As the Structure Submissions page contains deleted structures, it is possible to perform an undelete operation from this page.

Figure 6 showing the structure modification history for all the structures in the Fusion Registry
The Fusion Registry provides the means to view the details about each modification. These details include information about the HTTP Request, the authenticated User, and the Fusion Registry application that was running at the time the modification was made.

Figure 7 showing the modification details for a given structure
Roll Back Modification or Deletion
When viewing the modification details for a structure, the user is offered the ability to rolling back to the revision as it was at the given point in time. Rolling back will cause the Fusion Registry to re-submit the structure as it was in the given revision. This will take the effect of creating a new revision in the audit trail for the newly submitted structure.
Global Roll Back Modification or Deletion
It is possible to roll-back the entire content of the Registry to a particular date. In order to do this, navigate to Activity -> SDMX Transactions.
On this page, a table will be displayed containing a list of all the transactions in the Registry and a time selection control.
Selecting one of the transactions will provide the choice to “Roll Back to selected Transaction”. Activating this control will roll back the entire content of the Registry to that selected transaction. This can be thought of as a ‘global roll back’ option.
Download Logs for Modification
Downloading the logs will export a CSV file containing the server logs associated with the modification. The granularity of the logged information will depend on the log setting at the time the modification was made. Log settings are set under the Settings -> Debug menu. See the Setup guide for more information on log levels.
Comparing Prior Revisions of a Structure
The prior revisions of a structure can be compared by activating the “Compare Revisions” control which will bring up a dialog showing the differences between the revisions. The controls at the top of this dialog allow quick comparison between different revisions.

Figure 8 showing part of the comparison dialog
Structure Submission from File or URL
If you have Structures defined in a file these can be uploaded into the Fusion Registry via a control from the Registry Home Page.

Figure 9 showing the "Load Structures" control
Activating this control will open a modal which allows an SDMX structure file to be loaded. There is also a choice of 3 actions here: Replace (the default), Append and “Full Replace”.

Figure 10 showing the “Upload Registry Content” window
“Append” may only add new structures to those existing in the Registry. No modifications to existing structures will be permitted. “Replace” may add new structures and may modify any existing structures. “Full Replace” will remove all existing content from the Registry before replacing it with the contents of the uploaded file.
It is also possible to load content from an SDMX compatible Web Service. By selecting “URL” and supplying a valid address of an SDMX web service or structure file. For example the following URL would import all of the codelists from an SDMX Web Service:
Once the upload has succeeded a dialog will be displayed listing the structural changes to the system.